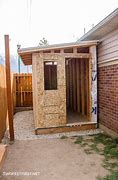
Are you in need of extra storage space for your outdoor tools, equipment, or other belongings? Consider building a lean-to shed! A lean-to shed is a simple and cost-effective solution that can provide you with additional storage space while complementing the aesthetics of your outdoor area. In this article, we will provide you with a step-by-step guide on how to build a lean-to shed using wood as the primary material. Follow these instructions to construct a functional and attractive wooden lean-to shed that meets your storage needs.
Step 1: Gather the Tools and Materials
The first step in building a lean-to shed is to gather all the necessary tools and materials. Here's a list of the basic tools and materials you will need:
- Tape measure
- Level
- Circular saw
- Hammer
- Nails
- Wood screws
- Wood boards
- Roofing materials (such as shingles or metal sheets)
- Paint or wood stain (optional)
Step 2: Choose the Location and Prepare the Site
Next, choose a suitable location for your lean-to shed. Consider factors such as accessibility, drainage, and sun exposure. Once you've chosen the location, clear the area of any debris or vegetation, and level the ground if necessary. Mark the perimeter of the shed using stakes and string, and make sure the corners are square.
Step 3: Build the Foundation
The foundation is a crucial element of any shed, as it provides stability and durability. For a lean-to shed, you have several options for the foundation, including concrete slab, wooden skids, or concrete blocks. Choose the foundation option that best suits your needs and budget. Follow the manufacturer's instructions or local building codes when constructing the foundation. Make sure the foundation is level and square, as it will affect the overall stability of the shed.
Step 4: Frame the Walls
Once the foundation is in place, you can start framing the walls of your lean-to shed. Use pressure-treated wood boards for the bottom plate and studs to ensure durability and resistance to moisture. Cut the boards to the appropriate length and nail or screw them together according to your shed's design. Use a level to ensure that the walls are plumb and square, and check the diagonals to make sure the walls are properly aligned.
Step 5: Install the Roof
After framing the walls, it's time to install the roof. Choose a roofing material that is suitable for your climate and matches the style of your outdoor area. If you're using shingles, start by installing the drip edge along the eaves of the roof. Then, lay the shingles starting from the bottom edge, overlapping them as you go up the roof. Use roofing nails to secure the shingles in place. If you're using metal sheets, follow the manufacturer's instructions for installation.
Step 6: Add Doors and Windows
Once the walls and roof are in place, you can add doors and windows to your lean-to shed. Measure and cut an opening for the door and install a pre-hung door according to the manufacturer's instructions. You can also add windows to provide natural light and ventilation inside the shed. Measure and cut openings for the windows, and install window frames and glass panes using appropriate hardware. Make sure the doors and windows are properly aligned, level, and securely fastened.
Step 7: Finish the Exterior
With the basic structure of the lean-to shed complete, it's time to finish the exterior. You can choose to paint or stain the wood to protect it from the elements and enhance its appearance. Select a paint or stain that is suitable for outdoor use and complements your outdoor space's style. Apply the finish evenly, following the manufacturer's instructions, and allow it to dry completely before moving on to the next step.
Step 8: Install Shelving and Storage
The final step in building a lean-to shed is to install shelving and storage solutions inside. Measure and cut shelves or racks to fit your storage needs, and attach them securely to the walls or studs using appropriate hardware. You can also add hooks, pegboards, or other organizational tools to maximize storage space and keep your belongings organized and easily accessible.
Conclusion
Building a wooden lean-to shed can be a rewarding DIY project that provides you with functional and attractive storage space for your outdoor belongings. By following the steps outlined in this article, you can construct a lean-to shed that meets your storage needs while adding value to your outdoor area. Remember to gather all the necessary tools and materials, choose a suitable location, prepare the site, frame the walls, install the roof, add doors and windows, finish the exterior, and install shelving and storage solutions. With proper planning, preparation, and construction techniques, you can enjoy the benefits of a well-built wooden lean-to shed for years to come.
So, roll up your sleeves and get ready to build your own lean-to shed! With some determination, patience, and basic carpentry skills, you can have a functional and stylish shed that enhances the functionality and aesthetics of your outdoor space. Happy building!
